


Deploy Azure Functions and Connect SitecoreAI Forms to Dataverse
Deploy Azure Functions & Connect SitecoreAI Forms to Dataverse
 Written by Amit Kumar
Posted on August 16, 2026 • 7 minutes • 1472 words
This article is part of a series.
- Part 1
- Part 2
- Part 3
- Part 4Deploy Azure Functions and Connect SitecoreAI Forms to Dataverse
- Part 5
Table of contents
- 🚀 Deploy Azure Functions and Connect SitecoreAI Forms to Microsoft Dataverse
- 📋 What We Will Build
- 🏗️ Architecture Overview
- 📺 Video Walkthrough: End-to-End Integration
- 💻 Step-by-Step Walkthrough
- 1. 🧪 Local Validation of Azure Functions
- 2. ☁️ Deploy Azure Functions to the Cloud
- 3. 🔐 Configure App Settings & Azure Key Vault
- 4. 🔌 Make the Create Function Webhook-Compatible
- 5. 📝 Configure the SitecoreAI Enquiry Form & Webhook
- 6. 📄 Place and Activate the Form in Page Builder
- 7. 🗄️ Verifying Records in Microsoft Dataverse
- 🛡️ Best Practices & Security Summary
- 💬 Frequently Asked Questions (FAQs)
- 📚 Summary
- 🧾Credit/References
In the previous article in this series, we built a production-ready Azure Functions backend for Microsoft Dataverse CRUD operations:
Azure Functions for Dataverse CRUD in .NET
In this fourth article, we complete the end-to-end integration by deploying those Functions to Azure, connecting a SitecoreAI Form through a secure webhook, creating an enquiry row in Dataverse, and retrieving enquiry records through a protected GET endpoint.
The final flow is straightforward:
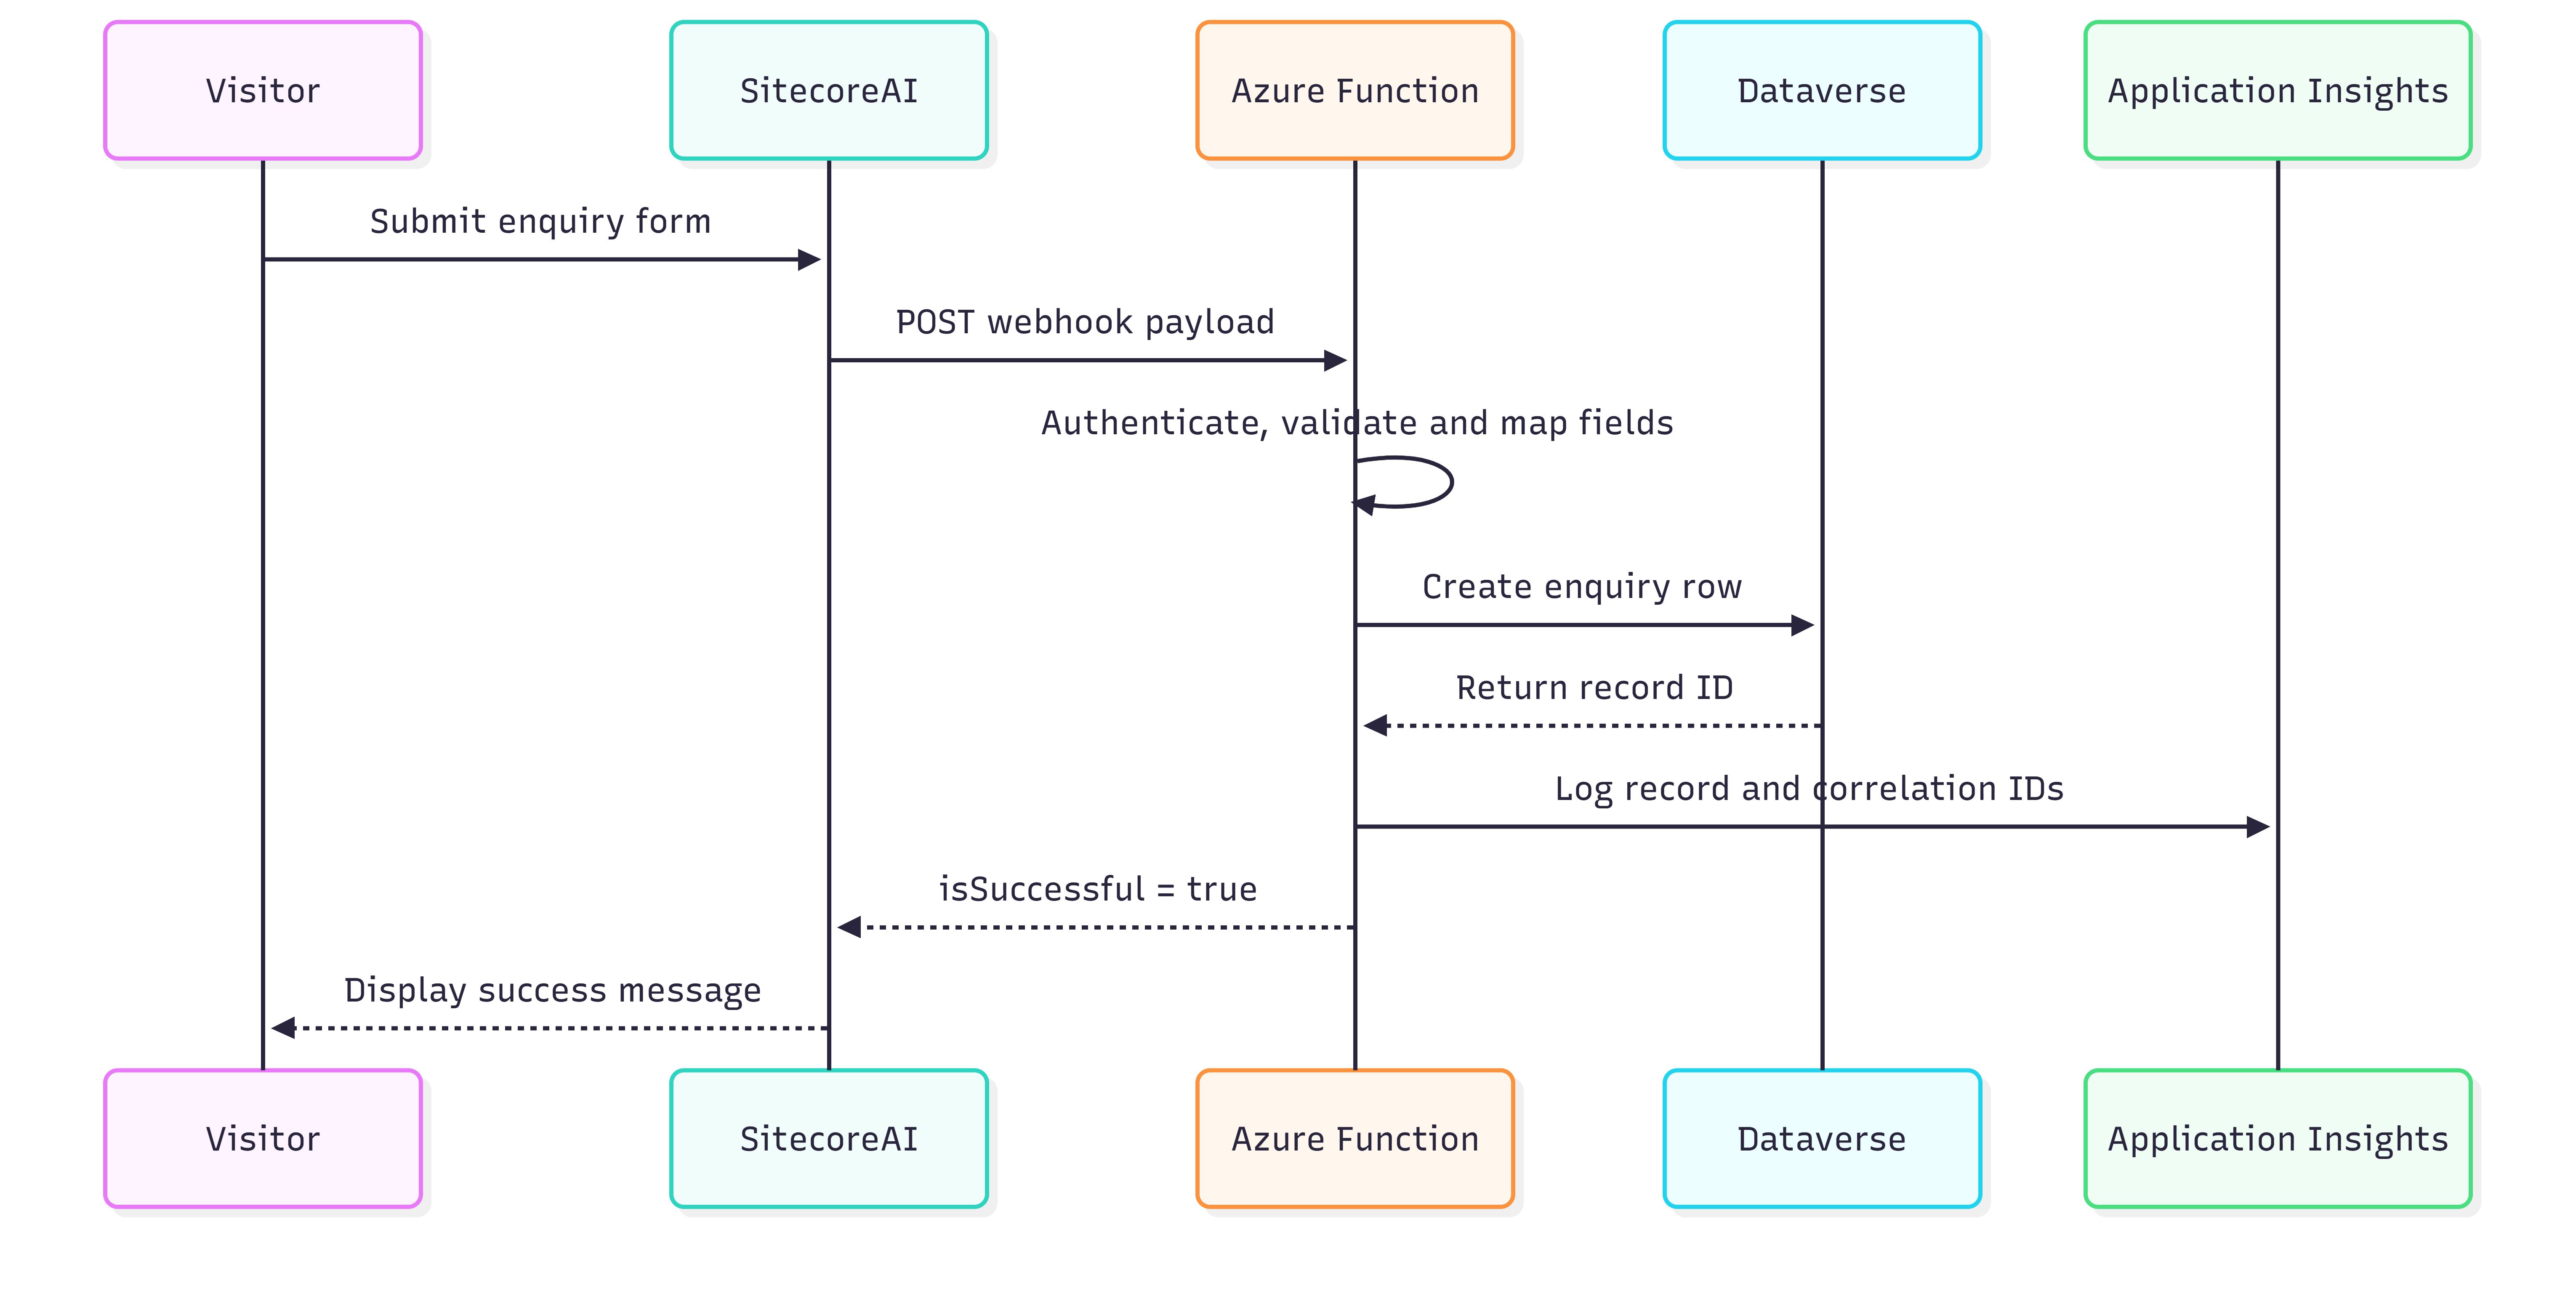
SitecoreAI Form ➡ Azure Function ➡ Microsoft Dataverse
- Validate the Azure Functions project locally.
- Deploy the .NET isolated Function App to Azure.
- Configure Dataverse application settings securely.
- Make the create endpoint compatible with SitecoreAI webhook responses.
- Add a protected GET endpoint for enquiry retrieval.
- Create and activate a SitecoreAI enquiry form.
- Configure an API-key-protected SitecoreAI webhook.
- Test the complete flow and verify the Dataverse row.
The flow decouples frontend collection from your Dataverse data plane using a secure, serverless intermediary:

🔄 Execution Flow Sequence
- The Azure Functions project from Session 3.
- An active Azure subscription with permissions to deploy Function Apps and Key Vault resources.
- A Microsoft Dataverse environment and the target enquiry table.
- An Entra ID App Registration / Application User with least-privilege Dataverse permissions.
- Visual Studio 2022 with the Azure development workload, or VS Code with Azure Functions Core Tools.
- Access to SitecoreAI Forms and Page Builder with permissions to manage webhooks.
SitecoreAI Forms
SitecoreAI Forms can dispatch data to external systems using webhooks. Review the official workflow in SitecoreAI Forms Overview
📺 Video Walkthrough: End-to-End Integration
1. 🧪 Local Validation of Azure Functions
Before pushing changes to Azure, ensure the .NET 8/9 Isolated worker starts and executes the CRUD routes locally.
dotnet clean
dotnet restore
dotnet build --configuration Release
func start
Typical local endpoints are:
POST   http://localhost:7071/api/dataverse/enquiries
GET    http://localhost:7071/api/dataverse/enquiries
GET    http://localhost:7071/api/dataverse/enquiries/{id}
PATCH  http://localhost:7071/api/dataverse/enquiries/{id}
DELETE http://localhost:7071/api/dataverse/enquiries/{id}
Test the create endpoint:
curl -X POST "http://localhost:7071/api/dataverse/enquiries" \
  -H "Content-Type: application/json" \
  -d '{
    "name": "Amit Kumar",
    "email": "amit@example.com",
    "message": "Local SitecoreAI integration test",
    "test": false
  }'
curl "http://localhost:7071/api/dataverse/enquiries?pageSize=25"
Microsoft provides direct deployment support through Visual Studio and VS Code. Refer to Develop Azure Functions using Visual Studio .
Right-click the Azure Functions Project ➡ Select Publish.
Select Target: Azure ➡ Specific Target: Azure Function App (Windows or Linux).
Choose your existing Resource Group and hosting plan, or provision a new one.
Select the Subscription, Resource Group, Region, Storage Account, and Application Insights resource.
Click Publish and allow the remote build to complete.
Example Function App Base URL:
https://func-sitecoreai-dataverse-prod-uks.azurewebsites.net
local.settings.json is strictly for local execution. In Azure:
Navigate to Function App ➡ Settings ➡ Environment variables ➡ App settings.
Add your Dataverse application credentials:
| App Setting Key | Production Value / Key Vault Reference |
|---|---|
| Dataverse__Url | https://orgXXXXX.crm.dynamics.com |
| Dataverse__ClientId | your-entra-app-client-id |
| Dataverse__TenantId | your-tenant-id |
| Dataverse__ClientSecret | @Microsoft.KeyVault(SecretUri=https://kv-app.vault.azure.net/secrets/DVSecret/) |
| APPLICATIONINSIGHTS_CONNECTION_STRING | InstrumentationKey=… |
Security Best Practice
Enable System-Assigned Managed Identity on the Function App and grant it Key Vault Secrets User role to resolve Key Vault references seamlessly.
SitecoreAI requires a predictable response contract. If the endpoint returns HTTP 200 without { "isSuccessful": true }, SitecoreAI flags a Negative response from the webhook error.
namespace SitecoreAI.Dataverse.Functions.Models;

public sealed record SitecoreWebhookResponse(
    [property: JsonPropertyName("isSuccessful")] bool IsSuccessful,
    [property: JsonPropertyName("message")] string Message,
    [property: JsonPropertyName("recordId")] Guid? RecordId = null,
    [property: JsonPropertyName("correlationId")] string? CorrelationId = null
);
Full Repository & Source Code
📱 Scan to access the complete SitecoreAI Dataverse Azure Functions repository
💡 If you want to review the full .NET Isolated implementation, request models, and function bindings, check out the complete project on GitHub:

Share your feedback or contribute to support the Sitecore developer community!
Front-End Headless Application Codebase
To see how the Next.js headless rendering host, environment variables (SITECORE_EDGE_CONTEXT_ID), and form styling are configured on the front-end, explore the full application repository on GitHub:
👉 AmitKumar-AK/sitecore-ai-codebase on GitHub
🌟 Support the Community: Feel free to star the repo, raise issues, submit PRs, or share your feedback to help improve this resource for the Sitecore developer community!
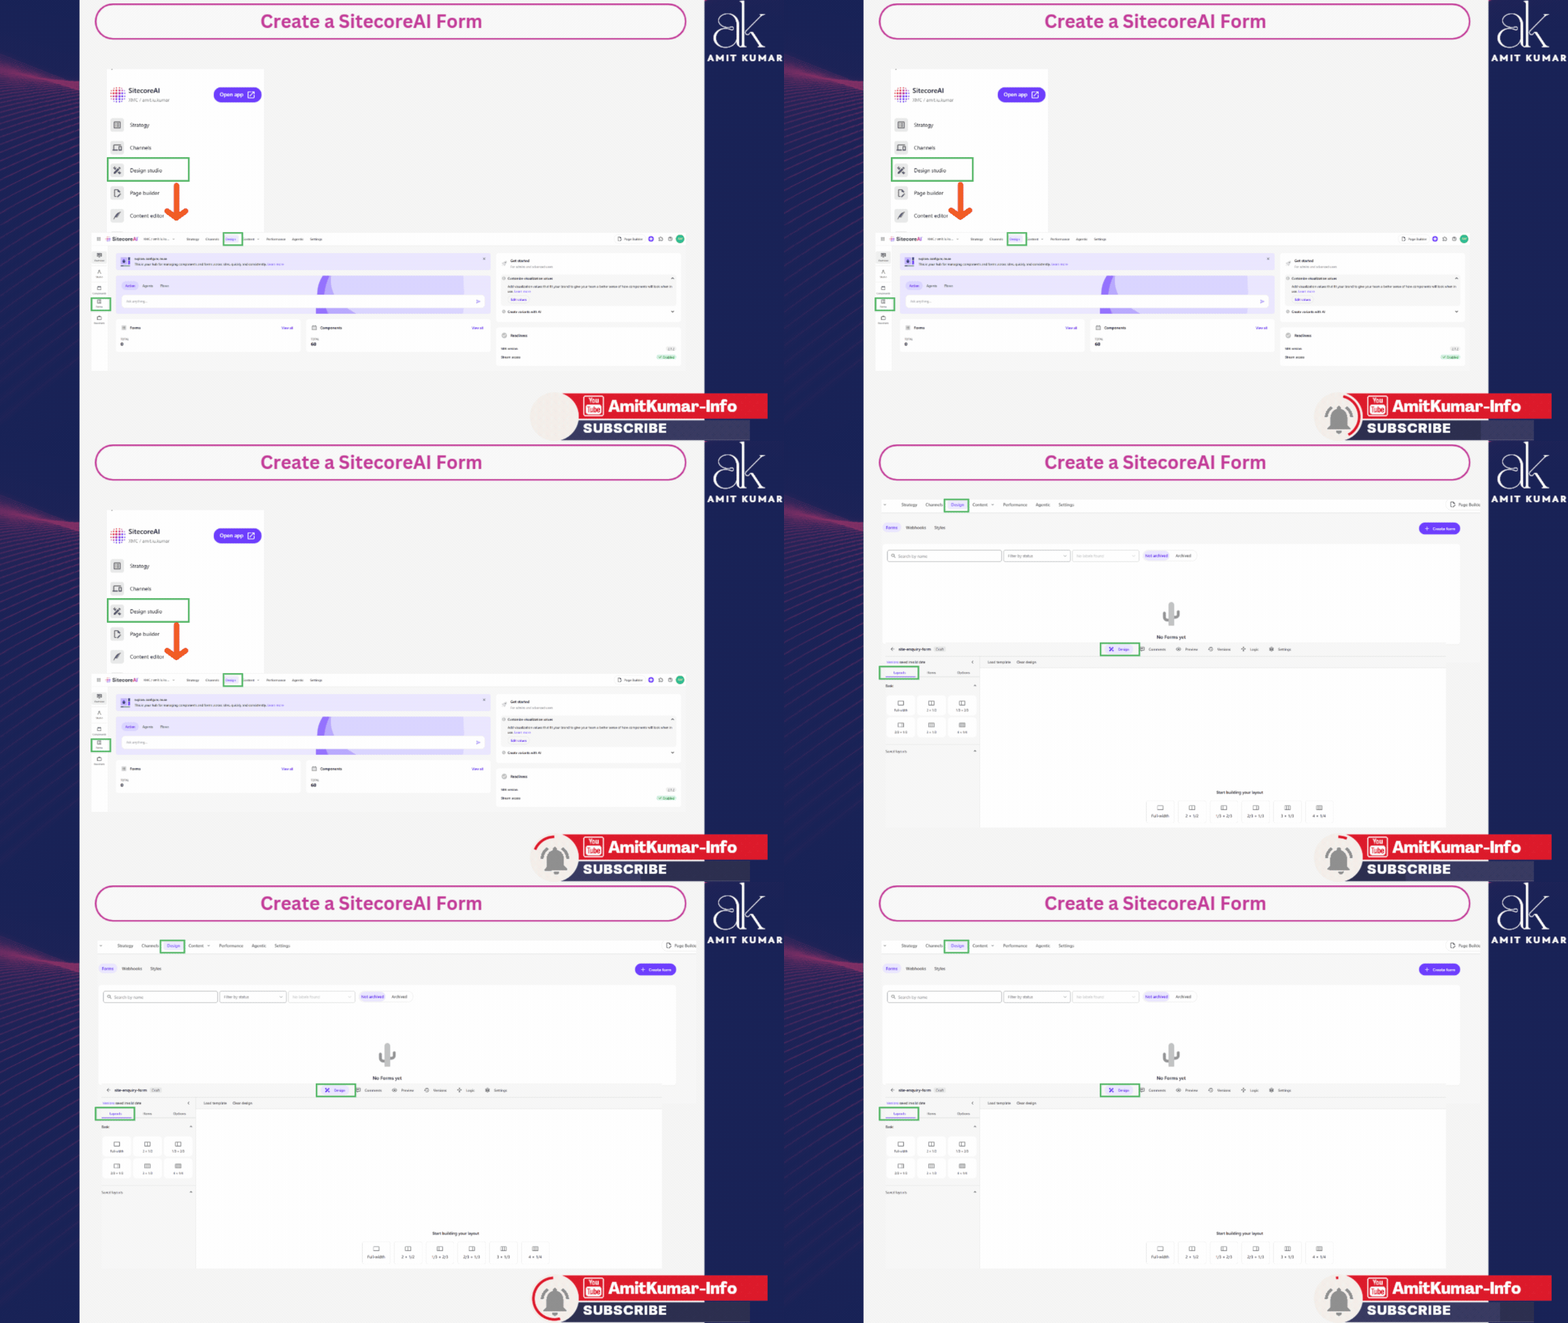
Navigate to SitecoreAI ➡ Design ➡ Forms.
Add input fields with matching keys:
txt_fullName (Single Line Text)
txt_Email (Email Address)
txtArea_enquiry (Multi-line Text)
list_feedbacktype (Dropdown / Choice)
Go to Form Settings ➡ Manage Webhooks ➡ Add Webhook.
Select API Key authentication.
Configure the following values:
Webhook URL: https://func-sitecoreai-dataverse-prod.azurewebsites.net/api/dataverse/enquiries
Header Name: x-functions-key
Header Value: [YOUR_FUNCTION_HOST_OR_FUNCTION_KEY]
Save the Webhook.
Overview of SitecoreAI Webhooks
Webhooks in SitecoreAI Forms define the destination endpoint for form submission data. They allow you to route submitted form payloads directly to external endpoints, third-party services, or serverless backends like Azure Functions
🔗 Webhook Setup Guide: SitecoreAI Forms - Create a Webhook
Click Test Webhook from the form settings dialog to verify payload serialization:
{
  "isSuccessful": true,
  "responseContent": "{\"Success\":true,\"Message\":\"Dataverse record created successfully.\",\"Data\":{\"id\":\"7634bbee-2996-f111-8075-70a8a5af01f4\"}}"
}
In SitecoreAI, open the target page within Page Builder.
Drag and drop the Form Component into the designated layout placeholder.
Select your newly configured Enquiry form from the properties panel.
Configure post-submit feedback (e.g., Thank you! Your enquiry has been received.).
Publish the page.
Overview of Submit Actions
In SitecoreAI Forms, Submit Actions define the user experience and post-submission behavior immediately after a website visitor submits a form. This determines what visual feedback the visitor sees or where they are navigated next upon successful or unsuccessful processing.
🔗 Submit Actions Guide: SitecoreAI Submit Actions Guide
Enable Forms in SitecoreAI Page Builder
After designing and activating your form, place it onto target pages using SitecoreAI Page Builder. [cite_start]This configuration walkthrough covers prerequisite front-end Headless SDK checks, placeholder rendering permissions, and site activation scopes required to render the Form component seamlessly
🔗 For comprehensive prerequisites and troubleshooting guidance: SitecoreAI Page Builder
Submit a live enquiry from the published webpage, then verify the record in Power Apps:
Open the page where SitecoreAI form added
Enter the required details and submit the form.
The form displays the configured success message and No negative webhook response is shown.
The payload contains the expected field keys.
Open Power Apps Studio .
Navigate to Tables ➡ Sitecore Enquiries.
Confirm that the new row exists with all columns mapped properly.
Zero Direct Access: Dataverse is completely decoupled from the public frontend.
Least Privilege: Entra Application User has access only to specific Dataverse tables.
Separation of Concerns: Forms use POST-only keys; internal tools access GET endpoints via separate credentials.
MCP Readiness: Clean input/output contracts enable straightforward exposure as Model Context Protocol (MCP) tools for enterprise AI agents.
The final architecture is
SitecoreAI captures the data, Azure Functions enforce the business contract, and Microsoft Dataverse stores the record.